Simple Ansible Project
15 May 2019 | 7 minutes to readAnsible makes deployment of software and configuration to multiple servers easy. A deployment process is described in a yaml file and is used by Ansible as instructions for what to do. In this article, I describe the process of deploying a simplt html file to multiple servers and have each of them serve the file using apache. To make it easy, virtual machines were used for everything. My setup consisted of 6 different VMs:
- 1 pfSense VM for network routing
- 1 Centos CLI VM to act as the controller
- 4 Alpine Linux VMs to act as nodes
Files for this project can be found in my Project repository in the Ansible Example folder. I only included the alpine VM because centos and pfsense are a little heavy.
Also included in the repository is the index.html file I serve, the hosts file I used for Ansible, and WebServ.yaml that ansible-playbook uses to deploy the project.
Configuring the Virtual Machines
First the pfSense VM is started up.
This will provide the networking between the different VM’s.
In the network settings of the VM, Adapter 1 should be attached to NAT and Adapter 2 attached to Internal Network.
This internal network is how the rest of the VMs will be connecting to each other.
Once the router has started,the Alpine VMs and the Centos “controller” VM can be started. Once everything has booted up and is ready to go, we will need to make sure the controller VM is able to access and log into each of the alpine VMs.
To do that we first need to share the controller’s id_rsa file with each of the alpine VM’s.
If the id_rsa file doesn’t exist, it can create it with the command ssh-keygen -t rsa.
Copying the id file to a target VM can be done with the command ssh-copy-id -i ~/.ssh/id_rsa root@192.168.1.xx, where root@192.168.1.xx is replaced with the username and IP of the target VM.
The password for the server will also need to typed in so the file can be copied over.
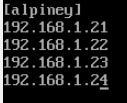
In my case, I have 4 alpine VMs running at:
- 192.168.1.21
- 192.168.1.22
- 192.168.1.23
- 192.168.1.24
Once the rsa_id is distributed to each of the VMs, the controller should be able to ssh into each of them without needing to enter a password.
This enables Ansible to access each of them without requiring a file with the passwords to be kept in plaintext somewhere.
Now that we are able to connect to each of the nodes, we will want to install Ansible and configure configure it to connect to the alpine VMs.
Once Ansible is installed, we want to add the alpine VMs to Ansible’s host file.
This file keeps a record of all the different machines Ansible can target assembled in groups.
This file is usually located in /etc/ansible/hosts.
for this project I grouped the alpine IPs in a collection named alpiney.
I define each of my nodes by listing out each ip, but I could also use 192.168.1.[21:24].
In our playbook that tells Ansible what to do, we will use the collection name to refer to these ips.
This in done with the hosts: alpiney command in the playbook yaml.
Telling Ansible what to do
The steps for the deployment are defined in a yaml file. for this project, there are 4 primary tasks that need to take place:
- Install
apache2on the node - Copy our
index.htmlfile to the node - Modify
index.htmlwith an Ansible variable - Make sure apache is running
Installing apache2 using Ansible is very straightforward.
We will use the apk module and define what package and what version of the package we want.
When this task is complete, apache will be installed and be in the default setup.
The yaml for this task till look like this:
- name: Install apache2
  apk:
    name: apache2
    state: latest
Next, we want to copy our index.html webpage over to the nodes.
This is done using the template module, and requires specifying a source and destination (src,dest).
To find where to place the html file, I needed to look at the configuration of apache2 located in /etc/apache2/httpd.conf and look for the DocumentRoot entry.
In my case, it was located in /var/www/localhost/htdocs.
We will use this directory in our yaml file to direct Ansible where to place the index.html file.
When the file is copied, we will also want to restart the apache service so it sees the file properly.
To do this, we will use a handler.
A handler can be called after or before certain events.
In my script, i use a notify tag which will execute the handler once the task is complete.
The handler is defined separately from the task, we only need to call it!
The code for this task looks like:
-name: Transfer index.html to node
  template:
    src: index.html # File is in same directory
    dest: /var/www/localhost/htdocs/index.html
  notify:
  - restart apache
...
handlers:
- name: restart apache # Matches name under notify
  service:
    name: apache2
    state: restarted
Now that the index.html file is present on the nodes, we only need to add our Ansible variable to the file and ensure apache is running.
For this task, I defined a variable named template_run_date, which grabs the time from Ansible like so:
vars:
  template_run_date: "{{ ansible_facts['date_time']['iso8601_micro'] }}"
To show how to replace values in files, I did it two different ways.
The first (and better) way to insert runtime variables is be referencing the variable within the file using {{ variable_name }}.
In the index.html file, I added the line {{ template_run_date }}.
When Ansible is ran, it will fetch the variable and replace it in the file.
I could have also used the ansible_facts variable instead of defining my own.
For this method, the modifications take place within the file that wants the variable, not the playbook file.
Another method is to use the replace command and regex.
To make it easy, I placed the text ##repl## in the index.html file.
It is easily targeted with the regex.
For the replace command, I specified the path of the file, the expression to evaluate, and the text to replace it with (path,regexp,replace).
The code to perform this in the playbook looks like:
-name: Insert template_run_date variable
replace:
  path: /var/www/localhost/htdocs/index.html
  regexp: '##repl##'
  replace: 'template_run_date val: {{ template_run_date }}'
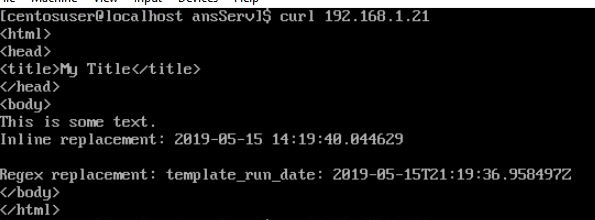
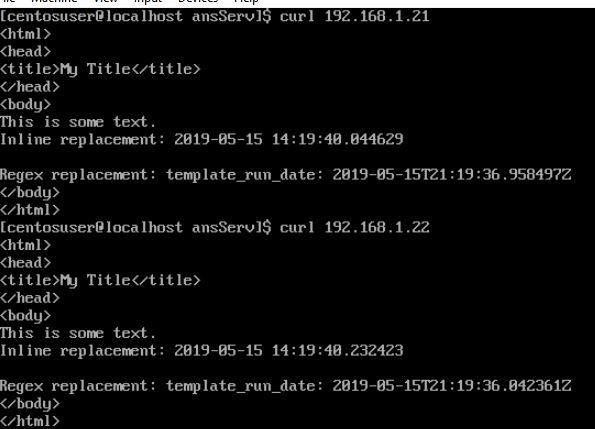
Our example index.html file is setup to show the variable using the inline method and the regex replacement method.
The full code for the html file is here:
<html>
	<head>
		<title>My Title</title>
	</head>
	<body>
		This is some text.
		Inline replacement: {{template_run_date }}

		Regex replacement: ##repl##
	</body>
</html>
When the replacements take place, the replacement done using the task will be data a little bit later than placing the varaible directly in the file.
Replacing {{ variable }} in a file is done when the file is copied to a node.
The replace task takes place after the file transfer because it is a separate task.
Both of these actions take place node, by node so even though the same instructions are applied to all nodes the time it is applied will be different as you can see in this image:
Once the file is on the server and properly modified, we will make sure apache is running.
This is just to make sure everything is seen correctly and apache is behaving.
If it is not running, it won’t be able to serve our index.html file (duh).
This is very simple, and is done using the following task:
- name: Ensure Apache is running
  service:
    name: apache2
    state: started
The complete yaml file can be found in the project repository.
Deployment
Now that we have written our playbook and setup our index.html file, we now want to deploy.
We do this using the command ansible-playbook <PB Name>.yaml.
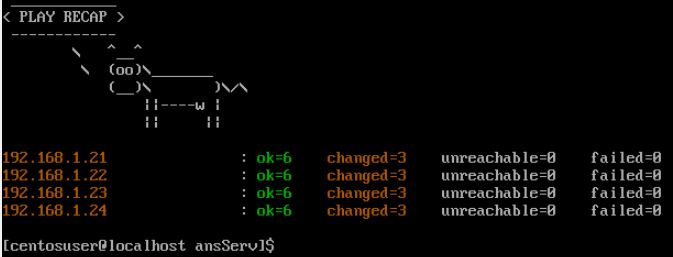
Ansible will now go through each task and perform it on each of the nodes.
Green text means the task was performed successfully.
Orange text means that the task completed successfully with some modifications taking place on the node.
Red text means there was an error.
Once it is complete, it will display a summary of what happened for each of the nodes.
If everything was successful, our web page will now be available on each of our nodes we deployed to.
To check it, use the curl command.
It will return our index.html file with our replaced text.